How to upload files to IPFS? — react.js tutorial
IPFS has developed a huge amount of files deployed there, as an excellent decentralised solution of storing data. Centralized databases…

IPFS has developed a huge amount of files deployed there, as an excellent decentralised solution of storing data. Centralized databases with files as images and other meta data of NFTs are not a quite good way of performing web3 trend. True decentralisation gives ownership to the people, creators, not for the institutions which owns storages. These entities only can censor or delete any material pushed to their service.
IPFS prevents it, by implementing a fully distributed storage protocol, which allows to serve files peer-to-peer.
Let’s see how implement a simple feature of uploading files to IPFS in react application.
Below you can find my youtube tutorial:
Github repo:
Setting up Infura account
Infura is a must have step in this tutorial:
Infura’s development suite provides instant, scalable API access to the Ethereum and IPFS networks.
As it is described, without Infura or a similar solution, it could be impossible to access IPFS network. To set up an account, visit link below:

Then sign up an account or log in. In a dashboard, at the top will be visible a button “Create new key”. Unfortunately, to setup an account, it is needed to provide credit card details, just in case you will upload to much files than defined in a free version. Do not share keys to an API, so it will be extremely difficult to overload free version.

After clicking “Create new key”, a modal with additional inputs will popup. It is needed to fill the network to IPFS and set a custom name, I just chose an “IPFS-tutorial”.

After creating new key, there will be displayed a subpage with:
- project Id,
- API key secret,
- IPFS api endpoint.

These values will be needed in our application.
React app
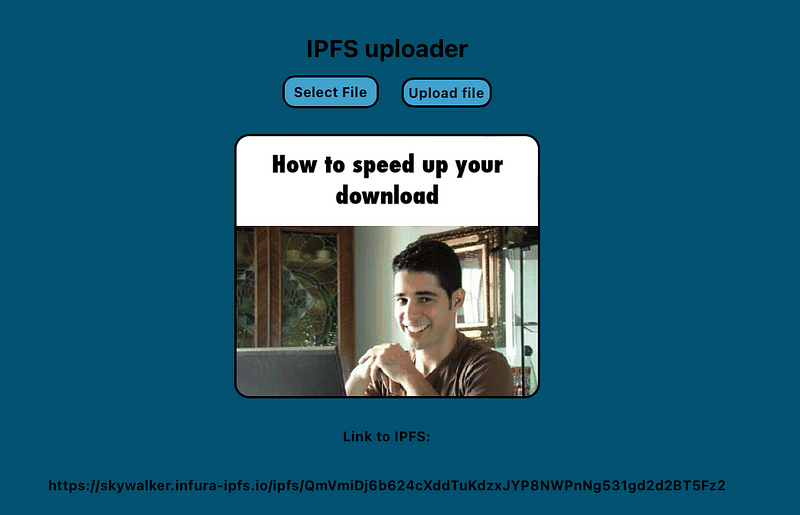
To have a quick start, I have created a basic template of react application, with input and buttons to upload files. You can find it in my GitHub, let’s focus on an uploading functionality.
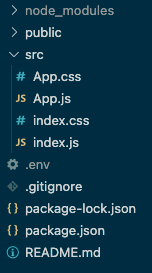
File structure
Below is presented a file structure to this application:
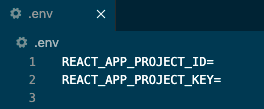
.env
To have application working securely, it is recommended to use env variables, to not deploy it and make vulnerable for some additional costs.
Use the react ability to store keys, by adding variables in .env file, created inside project directory (not in /src!).
Remember, variables have to begin with REACT_APP_… to work properly
Declare env variables in App.js
Store keys in a frontend, by adding in App.js below lines of code:
const projectId = process.env.REACT_APP_PROJECT_ID;
const projectSecretKey = process.env.REACT_APP_PROJECT_KEY;
const authorization = "Basic " + btoa(projectId + ":" + projectSecretKey);
Install ipfs-http-client package

To have an ability of connecting with IPFS through Infura, it is necessary to install above package.
Installation goes with a command:
npm i ipfs-http-clientFrontend handlers
In this tutorial will start creating upload function, by creating an uploadedImages variable with useState hook:
const [uploadedImages, setUploadedImages] = useState([]);Then create an ifs variable with installed package, firstly import it properly with below line of code:
import { create as ipfsHttpClient } from "ipfs-http-client";Then declare a variable:
const ipfs = ipfsHttpClient({
    url: "https://ipfs.infura.io:5001/api/v0",
    headers: {
      authorization,
    },
  });
This variable is like a provider of files, which will be added to network. Look that it was necessary to add an url of Infura, which will connect it with with IPFS network. To be authorized it is also necessary to pass “authorization” variable, created from api keys.
The submit function now has practically everything to perform the uploading part. Entire function will look like this:
const onSubmitHandler = async (event) => {
    event.preventDefault();
    const form = event.target;
    const files = form[0].files;

    if (!files || files.length === 0) {
      return alert("No files selected");
    }

    const file = files[0];
    // upload files
    const result = await ipfs.add(file);

    setUploadedImages([
      ...uploadedImages,
      {
        cid: result.cid,
        path: result.path,
      },
    ]);

    form.reset();
  };
To go through explanation part, it is necessary to mention, that capturing of files is made with input of type=”file”.
   <form onSubmit={onSubmitHandler}>
      <label for="file-upload" class="custom-file-upload">
           Select File
      </label>
      <input id="file-upload" type="file" name="file" />
      <button className="button" type="submit"
           Upload file
      </button>
    </form>
Function is targetting the first element of files array, by attachung it to a variable files. Simultaneously, is made a simple validation, to prevent uploading an empty array.
event.preventDefault();
const form = event.target;
const files = form[0].files;

if (!files || files.length === 0) {
  return alert("No files selected");
}

const file = files[0];
The uploading is initialised, by using ipfs variable and its function of adding a file to the network, it returns the cid and a path.
// upload files
    const result = await ipfs.add(file);

    setUploadedImages([
      ...uploadedImages,
      {
        cid: result.cid,
        path: result.path,
      },
    ]);

    form.reset();
File cid is a key, but path is a source phrase to the file, in this example an image.
<>
    <img
      className="image"
      alt={`Uploaded #${index + 1}`}
      src={"https://skywalker.infura-ipfs.io/ipfs/" + image.path}
      style={{ maxWidth: "400px", margin: "15px" }}
      key={image.cid.toString() + index}
    />
    <h4>Link to IPFS:</h4>
      <a href={"https://skywalker.infura-ipfs.io/ipfs/" + image.path}>
       <h3>{"https://skywalker.infura-ipfs.io/ipfs/" + image.path}</h3>
      </a>
  </>
As it can be caught, the url source to IPFS file is made with file path and prefix “https://skywalker.infura-ipfs.io/ipfs/".
To have more details what is IPFS and how it works, visit my 100 days of web3 challenge:

The IPFS thread:
Complete files
Below is attached the source code for an application.
App.js:
import "./App.css";
import { useState } from "react";
import { create as ipfsHttpClient } from "ipfs-http-client";

const projectId = process.env.REACT_APP_PROJECT_ID;
const projectSecretKey = process.env.REACT_APP_PROJECT_KEY;
const authorization = "Basic " + btoa(projectId + ":" + projectSecretKey);

function App() {
  const [uploadedImages, setUploadedImages] = useState([]);
  const ipfs = ipfsHttpClient({
    url: "https://ipfs.infura.io:5001/api/v0",
    headers: {
      authorization,
    },
  });
  const onSubmitHandler = async (event) => {
    event.preventDefault();
    const form = event.target;
    const files = form[0].files;

    if (!files || files.length === 0) {
      return alert("No files selected");
    }

    const file = files[0];
    // upload files
    const result = await ipfs.add(file);

    setUploadedImages([
      ...uploadedImages,
      {
        cid: result.cid,
        path: result.path,
      },
    ]);

    form.reset();
  };

  return (
    <div className="app">
      <div className="app__container">
        {ipfs ? (
          <div className="container">
            <h1>IPFS uploader</h1>
            <form onSubmit={onSubmitHandler}>
              <label for="file-upload" class="custom-file-upload">
                Select File
              </label>
              <input id="file-upload" type="file" name="file" />
              <button className="button" type="submit">
                Upload file
              </button>
            </form>
          </div>
        ) : null}
        <div className="data">
          {uploadedImages.map((image, index) => (
            <>
              <img
                className="image"
                alt={`Uploaded #${index + 1}`}
                src={"https://skywalker.infura-ipfs.io/ipfs/" + image.path}
                style={{ maxWidth: "400px", margin: "15px" }}
                key={image.cid.toString() + index}
              />
              <h4>Link to IPFS:</h4>
              <a href={"https://skywalker.infura-ipfs.io/ipfs/" + image.path}>
                <h3>{"https://skywalker.infura-ipfs.io/ipfs/" + image.path}</h3>
              </a>
            </>
          ))}
        </div>
      </div>
    </div>
  );
}

export default App;
App.css
.app {
  height: 100vh;
  display: grid;
  place-items: center;
}

.container {
  width: 100%;
  display: flex;
  flex-direction: column;
  justify-content: center;
  align-items: center;
}

.button {
  border: 3px solid black;
  border-radius: 16px;
  width: 120px;
  height: 40px;
  font-weight: bold;
  font-size: 16px;
  cursor: pointer;
  background-color: rgb(66, 162, 206);
}

input[type="file"] {
  display: none;
}

.custom-file-upload {
  padding: 8px 12px;
  cursor: pointer;
  border: 3px solid black;
  border-radius: 16px;
  width: 120px;
  margin-right: 30px;
  font-weight: bold;
  font-size: 16px;
  cursor: pointer;
  background-color: rgb(66, 162, 206);
}

.image {
  border: 3px solid black;
  border-radius: 20px;
}

.data {
  margin-top: 20px;
  display: flex;
  flex-direction: column;
  justify-content: center;
  align-items: center;
}

a {
  text-decoration: none;
  color: black;
}
index.css:
* {
  background-color: rgb(5, 82, 113);
}

body {
  margin: 0;
  font-family: -apple-system, BlinkMacSystemFont, "Segoe UI", "Roboto", "Oxygen",
    "Ubuntu", "Cantarell", "Fira Sans", "Droid Sans", "Helvetica Neue",
    sans-serif;
  -webkit-font-smoothing: antialiased;
  -moz-osx-font-smoothing: grayscale;
}

code {
  font-family: source-code-pro, Menlo, Monaco, Consolas, "Courier New",
    monospace;
}
.env:
REACT_APP_PROJECT_ID=
REACT_APP_PROJECT_KEY=
Conclusion
IPFS is a lacking element to make fully decentralised application, without loosing a quick perform of the code. It can boost the web3 trend and secure data, making a great difference and throwing a challenge to standard web2 solutions.


